728x90
반응형

1. 내가 한것
import 'package:flutter/material.dart';
import 'package:flutter/rendering.dart';

void main() {
  runApp(const MyApp());
}
class MyApp extends StatelessWidget {
  const MyApp({Key? key}) : super(key: key);

  @override
  Widget build(BuildContext context) {
    return MaterialApp(
        home: Scaffold(
          appBar: AppBar(title: Text('앱임'),),
          body: Container(child:  Text('안녕'),),
          bottomNavigationBar:
          Row(
            mainAxisAlignment: MainAxisAlignment.spaceEvenly,
            children: [
              Icon(Icons.phone),
              Icon(Icons.message),
              Icon(Icons.contact_page),
            ],
          ),
        )
    );
  }
}
2. 실제 답
import 'package:flutter/material.dart';
import 'package:flutter/rendering.dart';

void main() {
  runApp(const MyApp());
}
class MyApp extends StatelessWidget {
  const MyApp({Key? key}) : super(key: key);

  @override
  Widget build(BuildContext context) {
    return MaterialApp(
        home: Scaffold(
          appBar: AppBar(title: Text('앱임'),),
          body: Text('안녕'),
          bottomNavigationBar:
          BottomAppBar(
            child: Container(
              height: 50,
              child: Row(
                mainAxisAlignment: MainAxisAlignment.spaceEvenly,
                children: [
                  Icon(Icons.phone),
                  Icon(Icons.message),
                  Icon(Icons.contact_page),
                ],
              ),
            ),
          ),
        )
    );
  }
}
- 추가된것 잘 보기
3. Container 대용품
- SizedBox를 쓰면 에러 사라짐
- 좀더 가벼운것
import 'package:flutter/material.dart';
import 'package:flutter/rendering.dart';

void main() {
  runApp(const MyApp());
}
class MyApp extends StatelessWidget {
  const MyApp({Key? key}) : super(key: key);

  @override
  Widget build(BuildContext context) {
    return MaterialApp(
        home: Scaffold(
          appBar: AppBar(title: Text('앱임'),),
          body: Text('안녕'),
          bottomNavigationBar:
          BottomAppBar(
            child: SizedBox(
              height: 50,
              child: Row(
                mainAxisAlignment: MainAxisAlignment.spaceEvenly,
                children: [
                  Icon(Icons.phone),
                  Icon(Icons.message),
                  Icon(Icons.contact_page),
                ],
              ),
            ),
          ),
        )
    );
  }
}
4. 박스 디자인
import 'package:flutter/material.dart';
import 'package:flutter/rendering.dart';

void main() {
  runApp(const MyApp());
}
class MyApp extends StatelessWidget {
  const MyApp({Key? key}) : super(key: key);

  @override
  Widget build(BuildContext context) {
    return MaterialApp(
        home: Scaffold(
          appBar: AppBar(title: Text('앱임'),),
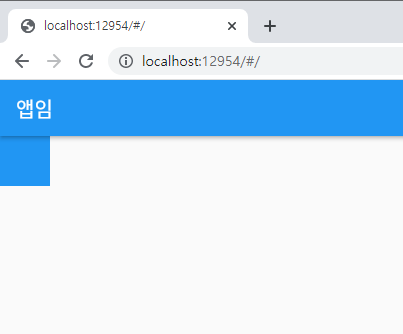
          body: Container(
          width: 50, height: 50, color: Colors.blue,
          margin: EdgeInsets.all(20),
          ),
        )
    );
  }
}- margin을 준경우

-
margin: EdgeInsets.fromLTRB(10, 0, 0, 0)- 위와 같이 하면 개별적으로 위아래양옆 간격을 따로 줄 수 있음
- padding을 준경우
- 글씨는 없지만 안에 간격이 생김

- 글씨 넣어서 확인
import 'package:flutter/material.dart';
import 'package:flutter/rendering.dart';

void main() {
  runApp(const MyApp());
}
class MyApp extends StatelessWidget {
  const MyApp({Key? key}) : super(key: key);

  @override
  Widget build(BuildContext context) {
    return MaterialApp(
        home: Scaffold(
          appBar: AppBar(title: Text('앱임'),),
          body: Container(
          width: 50, height: 50, color: Colors.blue,
          padding: EdgeInsets.all(20),
            child: Text('ddd'),
          ),
        )
    );
  }
}
4.1 decoration
import 'package:flutter/material.dart';
import 'package:flutter/rendering.dart';

void main() {
  runApp(const MyApp());
}
class MyApp extends StatelessWidget {
  const MyApp({Key? key}) : super(key: key);

  @override
  Widget build(BuildContext context) {
    return MaterialApp(
        home: Scaffold(
          appBar: AppBar(title: Text('앱임'),),
          body: Container(
          width: 50, height: 50, color: Colors.blue,
          decoration: BoxDecoration(
            border: Border.all(color: Colors.black)
          ),
          ),
        )
    );
  }
}- 이렇게 하는 경우 에러 발생
- 원래 원칙상 컬러 중복 안되고 decoration에 넣어야함
-
import 'package:flutter/material.dart';
import 'package:flutter/rendering.dart';

void main() {
  runApp(const MyApp());
}
class MyApp extends StatelessWidget {
  const MyApp({Key? key}) : super(key: key);

  @override
  Widget build(BuildContext context) {
    return MaterialApp(
        home: Scaffold(
          appBar: AppBar(title: Text('앱임'),),
          body: Container(
          width: 50, height: 50,
          decoration: BoxDecoration(
            border: Border.all(color: Colors.black)
          ),
          ),
        )
    );
  }
}

- 이렇게 테두리를 적용 가능함
5. 박스 정렬
import 'package:flutter/material.dart';
import 'package:flutter/rendering.dart';

void main() {
  runApp(const MyApp());
}
class MyApp extends StatelessWidget {
  const MyApp({Key? key}) : super(key: key);

  @override
  Widget build(BuildContext context) {
    return MaterialApp(
        home: Scaffold(
          appBar: AppBar(title: Text('앱임'),),
          body: Center(
            child: Container(
            width: 50, height: 50, color: Colors.blue,
            ),
          ),
        )
    );
  }
}
- 왼쪽 또는 오른쪽으로도 가능
5.1 하단 가운데 정렬
import 'package:flutter/material.dart';
import 'package:flutter/rendering.dart';

void main() {
  runApp(const MyApp());
}
class MyApp extends StatelessWidget {
  const MyApp({Key? key}) : super(key: key);

  @override
  Widget build(BuildContext context) {
    return MaterialApp(
        home: Scaffold(
          appBar: AppBar(title: Text('앱임'),),
          body: Align(
            alignment: Alignment.bottomCenter,
            child: Container(
            width: 50, height: 50, color: Colors.blue,
            ),
          ),
        )
    );
  }
}
5.2 박스width 가로로 가득설정
width: double.infinity, height: 50, color: Colors.blue,
- width를 double.infinity로 하면됨

- 단 부모를 넘지 않는 선에서 가능함
GitHub - 3DPIT/study
Contribute to 3DPIT/study development by creating an account on GitHub.
github.com
728x90
반응형
'CS Study > Flutter(플러터)' 카테고리의 다른 글
| 2021.12.29_05.Flexible (0) | 2021.12.29 |
|---|---|
| 2021.12.29_04.AppBar (0) | 2021.12.29 |
| 2021.12.28_02.가로세로배치하는법과Scaffold (0) | 2021.12.28 |
| 2021.12.27_1.2기본위젯4가지 (0) | 2021.12.28 |
| 2021.12.27_1.1안드로이드최신버전플러터프로젝트생성 (0) | 2021.12.27 |


댓글